
Creating a stock change order item
Changes or corrections to the stock, for example:
- Blocking products
- Switching locations
- Changing the owner
- Changing attributes/properties/quantities
-
Click
 next to Open and click Add.
-
Add the planned goods you want to make changes to.
Note: Usually, you will want to change attributes for goods in stock. Use stock selection to choose the goods.A dual tile appears.
-
Double-click the tile or click > Edit to make changes to the goods.
-
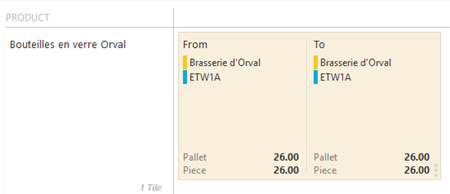
In the Edit window, consult the original product attributes in the From Stock column and change the attributes to your liking in the To Stock column.
Note: When you are changing quantities, you have to alter Gross en Net Weight proportionally. For example, you cannot increase the gross weight and lower the net weight.
 Tip: Change the Status of the goods to block them in the inventory.Tip: Use
 to copy a change to all other planned goods in the order item.
 -
Click Save.
Tip: Click Save & Copy if you want to add a similar tile. An identical tile is created, which you can amend if necessary.Tip: You can also click > Add in the row the tile is located in to generate a tile of the same product.
-
Click
 in the task bar to save any changes.