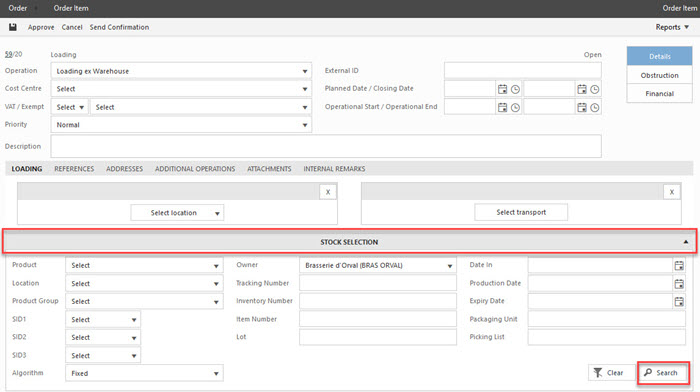
Using stock selection (loading, stock change or VAS)

To add planned goods to a loading, stock change or VAS order item, you can create planned goods or use stock selection. To add planned goods using stock selection, do the following:

  1. Create an order item or open one in the Order Item submenu using the filters.
  2. Click the Stock Selection bar.
  3. Select a Product from the drop-down menu.
    Note: The owner is filled in automatically based on the customer you have selected on order level, but this can be altered in case there are multiple owners available for one customer.
  4. Optionally, fill in the necessary fields to search more specifically.
    Tip: Using more filters will reduce the search time and optimize the results.
    Note: The Algorithm field determines how the search results are displayed.
    Select ... To sort the results ...
    Fixed Per stock line
    Note: Fixed is selected by default, because it presents the most detailed overview of the available stock.
    FIFO (First In First Out) According to Date In
    FPFO (First Produced First Out) According to Production Date
    FEFO (First Expired First Out) According to Expiry Date
    Free Randomly. Any stock line matching the criteria can be selected.
    Lot According to Lot Number
  5. Click Search.
    The search results appear in a grid.
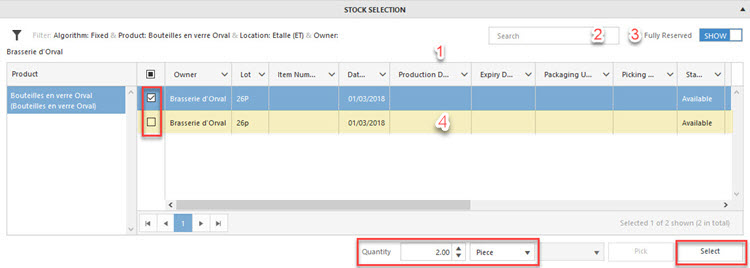
    Tip: Click to change the filters.
    Tip: Use additional tools to narrow down the search:
    No. Tool Use
    1 Grid header Click a grid header to sort the results in ascending or descending order.
    2 Smart search bar Start typing, for example, an order number. Results appear as you type.
    3 Fully Reserved toggle Show all stock or only non-reserved stock.
    4 Colour coding Some lines have a specific background colour. See the status of the available stock:
    • White: The stock line has no reservations.
    • Yellow: The stock line has been partially reserved.
    • Pink: The stock line is fully reserved or more stock is reserved than available.
      Note: Only shown when the Fully Reserved toggle is off.
  6. Select the line(s) you want to add using the check boxes and specify the quantity if necessary.
    Tip: Use the check box in the grid header to include or remove all items.
    Note: Search results might be listed on more than one page, as one page includes maximum 50 search lines. Select the check box in the grid header to include all items and repeat for the other pages if necessary.
  7. Click Select.
  8. Click in the task bar to save any changes.
The planned goods have been added to the order item.
The order item is ready to be approved.